Resources
{beginAccordion}
Online Banking Guides
{openTab}
{endAccordion}
Customer Support
Commercial Banking Support
(833) 325-7902
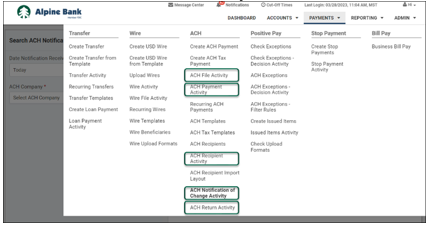
ACH
Access ACH Services*
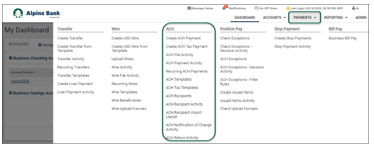
ACH functions detailed throughout this user guide will be found within the ACH menu under the PAYMENTS dropdown menu.
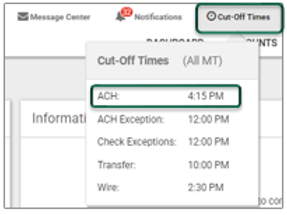
Cut-off times are available from within the Cut-Off Times menu.
{beginAccordion}
CREATE AN ACH RECIPIENT
An ACH Recipient is the person or entity that will receive the ACH transaction being sent.
- Select ACH Recipients from the ACH menu under the PAYMENTS dropdown.
- Select Add Recipient from the lower right side of the screen.
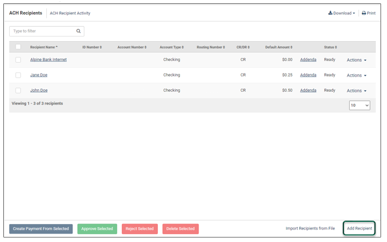
Note: If you have a CSV file of ACH recipients, you may upload it by selecting Import Recipients from File instead of Add Recipient.
- Complete the required fields within the Add Recipient form (Recipient Name, Account Number and Routing Number), then select Save. If desired, Addenda information may be provided (this is transaction-specific information that you would like to send to the receiving bank).

- You will receive a pop-up confirmation message after selecting Save.
NOTE: As you add recipients, they will be compiled into a directory. From the ACH Recipients list, you may search through existing recipients or create new recipients. You may also download or print the list of recipients or create a new ACH payment. If Dual Control is enabled for ACH Recipients, the approver may Approve Selected or Reject Selected recipients from this screen.
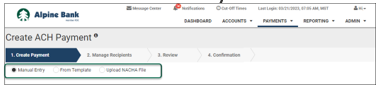
CREATE ACH PAYMENT - MANUAL ENTRY
Complete the following steps to enter ACH transactions manually:
- Select Create ACH Payment from the ACH menu under the PAYMENTS dropdown.
- Ensure that Manual Entry is selected under 1. Create Payment.
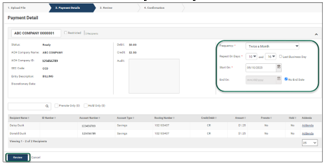
- Complete all required fields (*) within the Payment Header Information form and select Add Recipients.
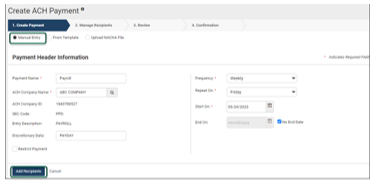
Note: Restrict Payment allows only users with the Restricted Batch entitlement access to view and approve the payment.
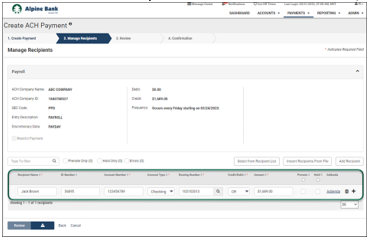
- Complete all required fields (*) within the Manage Recipients form. Use
 and
and  to add/remove recipients. Once all recipients have been added, select Review.
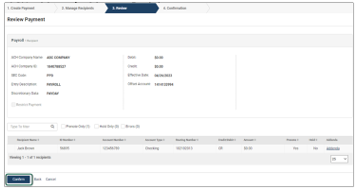
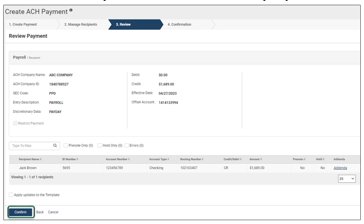
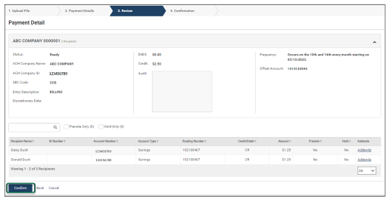
- Carefully review the ACH payment information, then select Confirm.
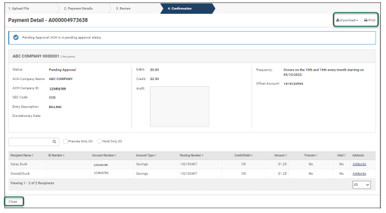
- You will receive a confirmation message that the ACH Payment was successfully created.
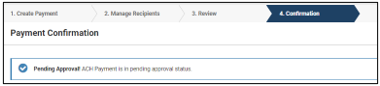
Note: If your account is set up with Dual Control for ACH requests, one user will need to create the ACH payment, which will place it in an approval status and another user will then need to transmit the batch. This step can be completed from the Payments Pending Approval widget on the Dashboard or from the ACH Payment Activity menu.
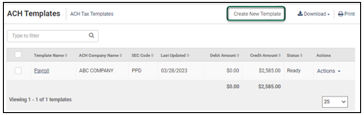
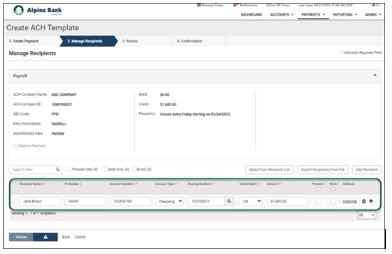
CREATE ACH TEMPLATE
You can create ACH templates that will allow you to save time when creating and initiating repetitive ACH payments. Complete the following steps to create an ACH Template:
- Select ACH Templates from the ACH menu under the PAYMENTS dropdown.
- Select Create New Template from the upper right-hand side of the screen.
- Complete all required fields (*) within the Template Header Information form, then select Add Recipients when ready.
Note: Restrict Template allows only users with the Restricted Batch entitlement access to view and approve the template.
- Complete all required fields (*) within the Manage Recipients form. Use and to add/remove recipients or select Import Recipients from File to import a CSV file containing recipient information. Once all recipients have been added, select Review.

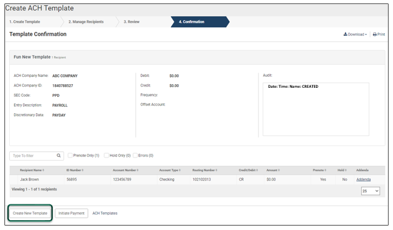
- Carefully review the ACH template information, then select Confirm.
- From the Template Confirmation screen, you can create a new template, initiate a payment, or select ACH Templates to view templates that you have created.
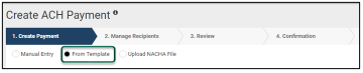
CREATE ACH PAYMENT – FROM TEMPLATE
- Select Create ACH Payment from the ACH menu under the PAYMENTS dropdown.
- Ensure that From Template is selected under 1. Create Payment.
- All ACH templates will be listed below. Use the search bar to filter through the templates. To create a new template, select Create New Template from the upper right side of the screen. When ready, place a checkmark next to one or multiple templates and select Initiate Selected Templates.
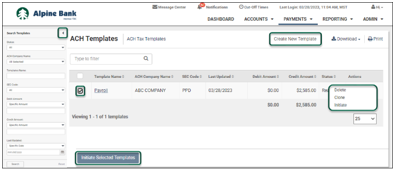
NOTE: From the Actions dropdown, you may Delete, Clone or Initiate any template.
- Choose the Frequency and Effective Date, then select Add Recipients.
- Ensure that the desired recipients are listed and select Review.
NOTE: If additional recipients need to be added or removed, use the use or icons to update the template.
- Carefully review the ACH payment information, then select Confirm.
Note: If changes to the template were made, checkmark the box toApply updates to the Template.
- From the Payment Confirmation screen, you can create a new payment or view your ACH activity. You may also download or print the confirmation page.

Note: If your account is set up with Dual Control for ACH requests, one user will need to create the ACH batch which will place it in an approval status Another user will then transmit the batch to send to the recipient.
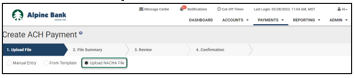
CREATE ACH PAYMENT – UPLOAD NACHA FILE
Nacha files are created using accounting software and may be uploaded and initiated using the steps below.
- Select Create ACH Payment from the ACH menu under the Payments dropdown.
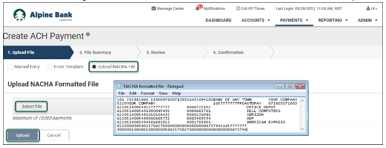
- Ensure that Upload NACHA File is selected under 1. Create Payment.
- To upload your Nacha file, click Select File. Once you have found the correct file, double click the file, then select Upload.
- Choose the Frequency and Effective Date, then select Review.
- Carefully review the ACH payment detail, then select Confirm.
- From the Payment Confirmation screen, you may download or print the page.
Note: If your account is set up with Dual Control for ACH requests, one user will need to create the ACH batch which will place it in an approval status. Another user will then transmit the batch to send to the recipient.
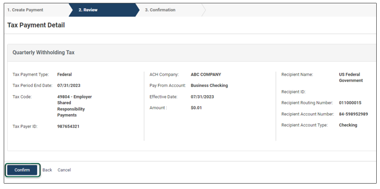
CREATE ACH TAX PAYMENT
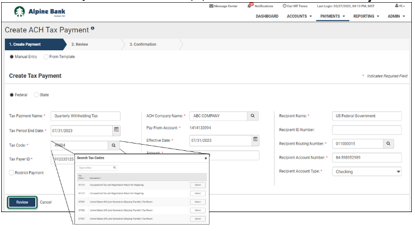
- Select Create ACH Tax Payment from the ACH menu under the PAYMENTS dropdown.
- Select the type of tax payment you would like to make (Federal or State). Complete all required fields (*) within the Tax Payment form, then select Review.
- Carefully review the tax payment detail, then select Confirm.
- From the Payment Confirmation screen, you may create another payment, save the payment as a template, or view your ACH activity. You may also download or print the confirmation page.
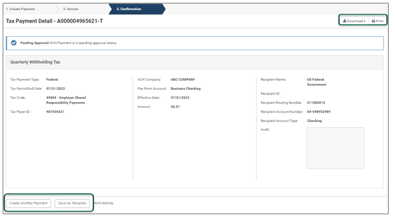
Note: If your account is set up with Dual Control for ACH requests, one user will need to create the ACH batch which will place it in an approval status. Another user will then transmit the batch to send to the recipient.
ACH ACTIVITY REPORTS
From the ACH menu under the Payments dropdown, select one of the following to view reports for your ACH activity:
- ACH File Activity
- ACH Payment Activity
- ACH Recipient Activity
- ACH Notification of Change Activity
- ACH Return Activity
{endAccordion}
* ACH services are intended for business customers only, require additional agreements, and are subject to underwriting and approval. ACH processing is subject to bank business days: Monday through Friday, excluding federal holidays, and cut-off time requirements. Certain transaction fees and limitations apply. Please refer to the product enrollment form and the terms and conditions.